![]()
An Exit-Intent lightbox, or website pop-up, appears to visitors as they attempt to leave your website, often to present them with an offer or promotion. A typical example of an Exit-Intent lightbox is a pop-up form that invites visitors to sign up for a newsletter in exchange for a discount on their next order. This is a simple but effective way to capture and convert those visitors before you lose them.
In this tutorial, we show you how to create an Exit Intent lightbox in Digioh that displays an email sign up form and then integrate the lightbox with your Magento account so the form appears when visitors leave your store. To round out the tutorial, we also show you how to integrate the lightbox with your MailChimp account so subscribers are added to a list and receive a welcome email. We use Mailchimp in this example; however, the steps to integrate your ESP will be similar for other email platforms as well.
Part I. Create an Exit-Intent lightbox in Digioh
To create an Exit-Intent lightbox in Digioh, first create an associated Exit-Intent rule that tells the lightbox to appear when the user’s mouse exits the browser window on one of its four sides. Then, create a lightbox condition and add the Exit Intent rule to the condition in order to set up the association.
Step 1. Create a new lightbox
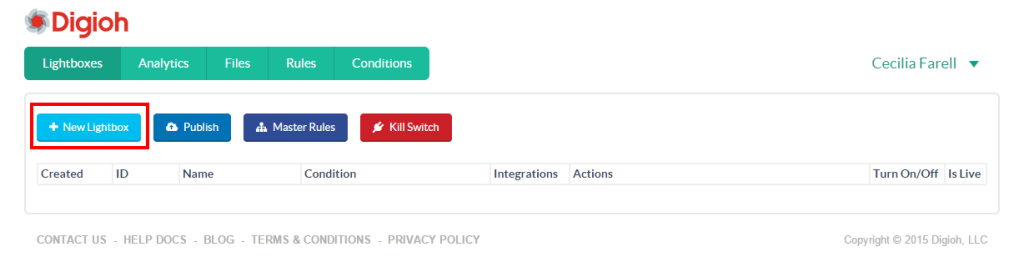
Log in to Digioh and click New Lightbox.
On the Choose a Theme screen, select one of the email sign up themes. Don’t worry about design for now.
On the Choose a Condition for Your Lightbox screen, click Skip This Step.
On the Name Your Lightbox screen, enter a descriptive name (e.g., My Exit Intent Lightbox) and click Save Name.

Step 2. Create an Exit-Intent rule for your lightbox
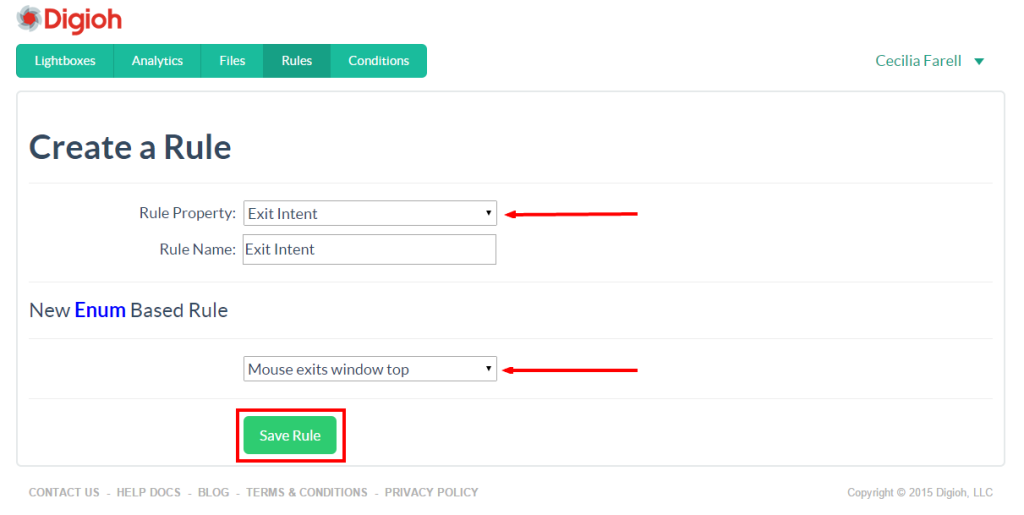
On the Digioh menu, click Rules and then click Create a New Rule.

On the Create a Rule screen, select Exit Intent from the Rule Property drop-down list, select the mouse exit that will trigger the lightbox (e.g., Mouse exits window top), and then click Save Rule.
Step 3. Create a condition
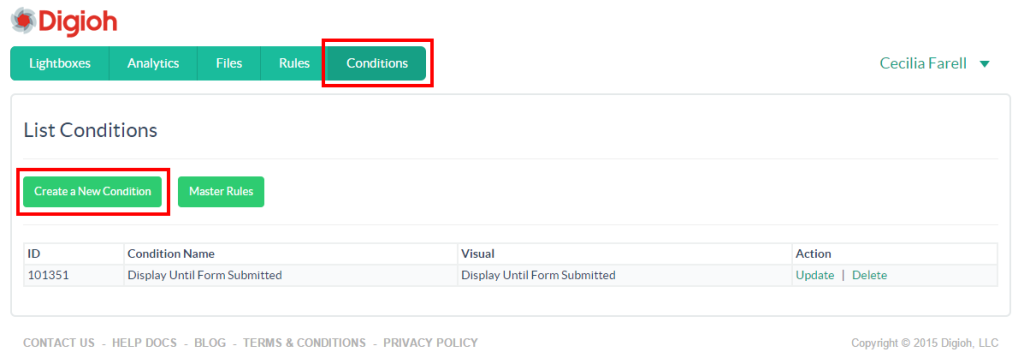
On the Digioh menu, click Conditions and then click Create a New Condition.
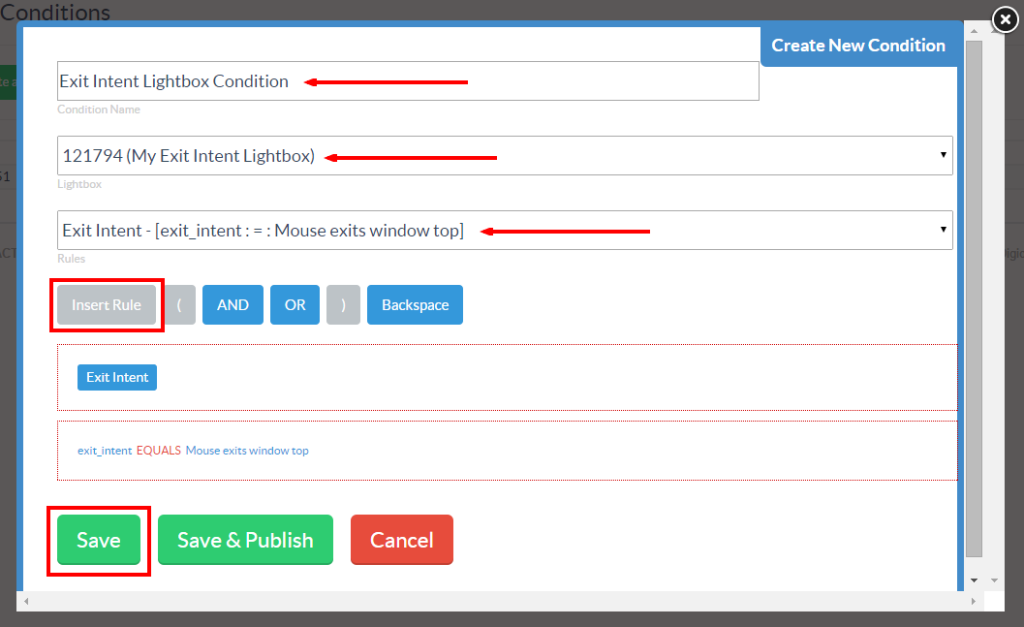
On the Create New Condition pop up, enter a name for the condition (e.g., Exit Intent Condition), select the lightbox you created in step 1 from the Lightbox drop-down list (My Exit Intent Lightbox), and then select the rule you created in step 2 from the Rules drop-down list (Exit Intent).
Click Insert Rule and then click Save.
Step 4. Customize and preview your lightbox
On the lightbox list, click the name of the lightbox to open it in the lightbox editor.

Customize the layout, text, buttons, and images on the sign up form as needed. You can also add blocks of custom HTML code. For detailed help, see the Editor section of the Digioh Help Docs.

To choose what happens after a user submits the lightbox form, click the Form section below the open Layout section and make the needed changes. The default behavior is to show a Thank You page.
To preview how your lightbox will look and work, click Save & Preview and then select Preview Exit from the drop-down menu.
Step 5. Publish your lightbox
When your lightbox looks and works the way you want, click Save & Publish and then click Lightboxes to return to the lightbox list. You can now confirm that the lightbox is live and turned on.

Part II. Integrate the lightbox with your Magento store
To integrate your Exit Intent lightbox with your Magento store, copy and paste the embed code snippet generated by Digioh.
Step 1. Open the Magento design editor
Log into your Magento account.
On the Magento Admin Panel menu, click System and then click Configuration.

On the left sidebar, click Design under Configuration.

Step 2. Copy the embed code snippet
Go back to your Digioh account.
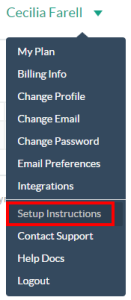
Click your name on the upper right-hand corner of the screen and then click Setup Instructions on the drop-down menu.
On the Setup Instructions screen, select and copy the code that appears in the Embed Code Snippet box.

Step 3. Embed the code in Magento
Go back to the Magento design editor.
Scroll down to the Footer section and click inside the Miscellaneous HTML text box. Paste the embed code you copied in step 2.

Click Save Config.

Your Digioh Exit Intent lightbox is now integrated with your Magento store. If you need more help on using the Magento Admin Panel, visit Magento Help.
Part III. Integrate the lightbox with a MailChimp list
To integrate your lightbox sign up form with a MailChimp list, connect your Digioh account to your MailChimp account and then select the list. To automatically send subscribers a welcome email, use the MailChimp Automation feature to set up a welcome message workflow for the list (see the section on Automation in the MailChimp Knowledge Base).
Step 1. Connect your Digioh account to MailChimp
Go back to your Digioh account.
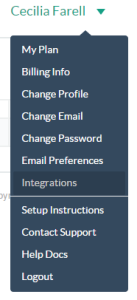
Click your name on the upper right-hand corner of the screen and then click Integrations on the drop-down menu.
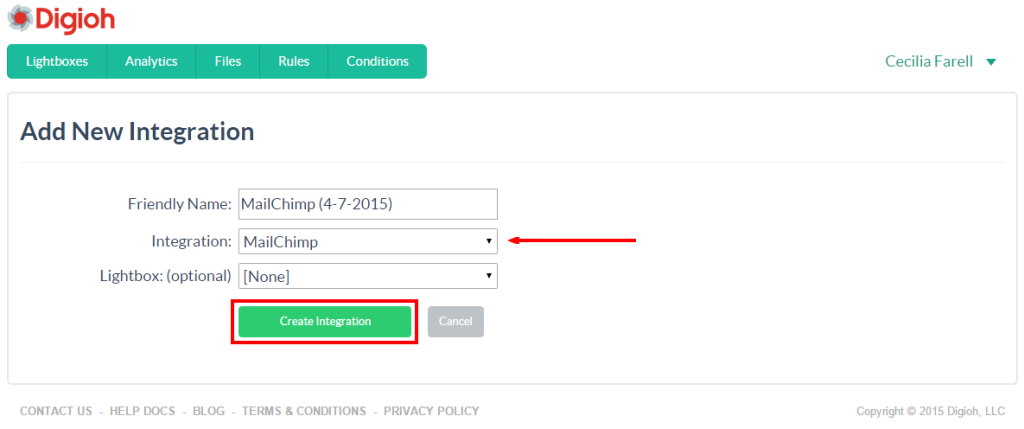
On the List Integrations screen, click Create a New Integration.

On the Add New Integration screen, select MailChimp from the Integration drop-down list and then click Create Integration.
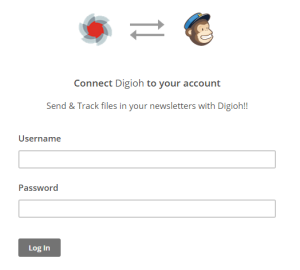
In the Connect Digioh to your account form, enter your MailChimp Username and Password, and then click Log In.
Step 2. Select the MailChimp list
On the EM Choose List screen, click Select next to the MailChimp list you want to integrate with the lightbox sign up form.
Note: If you want subscribers to automatically receive a welcome email, select a list that you have configured with a welcome message automation workflow (see the section on Automation in the MailChimp Knowledge Base).

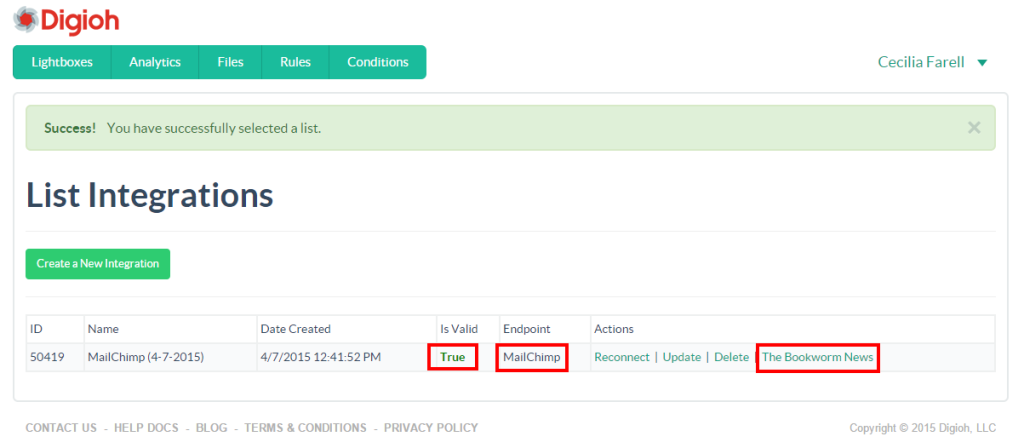
On the List Integrations screen, confirm that Is Valid is set to True, that the Endpoint is MailChimp, and that you have selected the correct mail list.
Step 3. Add the MailChimp integration to the lightbox
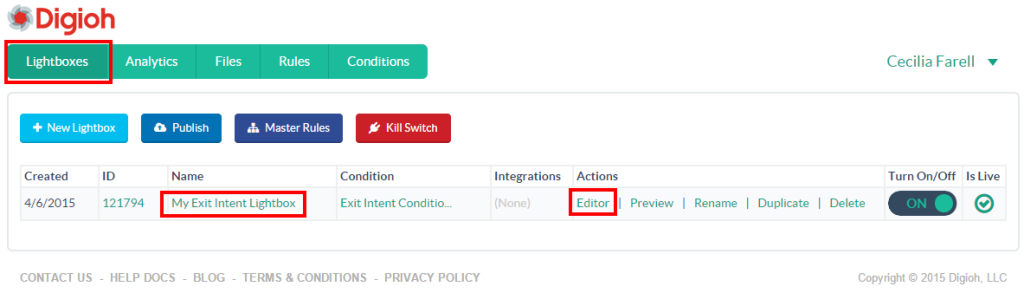
On the Digioh menu, click Lightboxes.
On the lightbox list, click the name of the lightbox to open it in the lightbox editor.
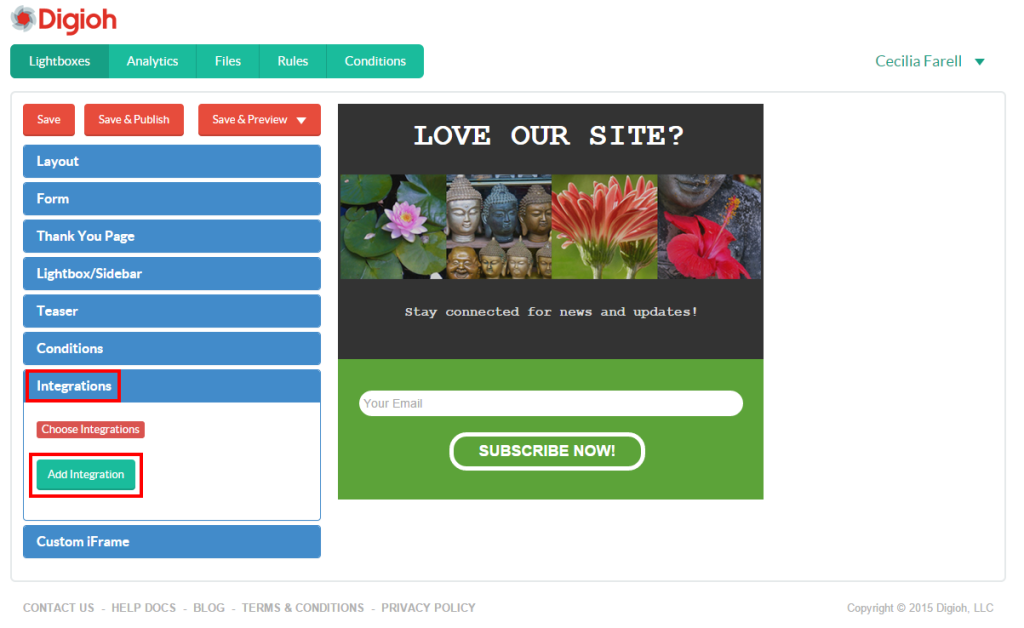
In the lightbox editor, click the Integrations section and then click Add Integration.
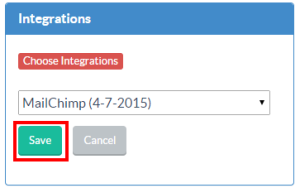
In the Integrations section, select the integration you created in step 1 (MailChimp) and click Save.
Click Save & Publish and you’re done.
Be sure to test and preview your lightbox on your Magento store. Better yet, sign up through the lightbox to really see things in action.
For more help creating your exit-intent lightbox, check out our guide, The Perfect Exit-Intent Lightbox.
Perfect tutorials! Its very easy to follow. Keep posting How To articles. It really helps a lot.
Thanks John! We’re always happy to help.