So you’ve built a beautiful website with Wix.com. Now you need to convert your website visitors into loyal customers, and there’s no better channel to grow and nurture visitors than with email marketing.
You want them to sign up to your email list so you can start building a relationship by sending out great newsletters, promotions, and special updates, but how do you start?
This guide will show you 5 Free and Easy Ways to Grow your Email List to gain more customers, fans, and maybe even a few new friends through your Wix website.
#1 – Add an Email Capture Lightbox
#2 – Offer a Discount Coupon
#3 – Use Fewer Fields
#4 – Give away a Free PDF
#5 – Send New Product Alerts
1. Add an Email Capture Lightbox
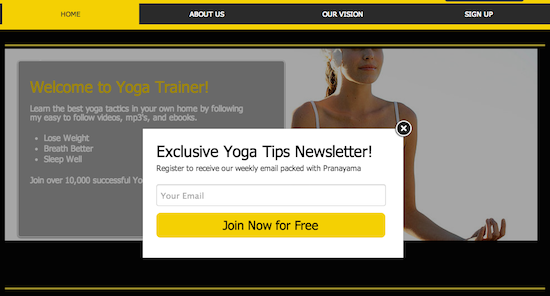
The single best way to capture more email list signups is to add a Lightbox to your Wix website. What is a Lightbox? Chances are you’ve seen more than a few; they are popular across the web because they are so effective. A Lightbox:
- Is an in-window pop-up form, therefore, it doesn’t trigger pop-up blockers
- Grays out the rest of your site, focusing visitors on the sign up form
- Can easily be canceled or clicked out of so it doesn’t interfere with browsing
You can also customize the language in the box to incentivize visitors to sign up. For example, you can offer to send new product updates or promise your new subscribers a discount on their first purchase.
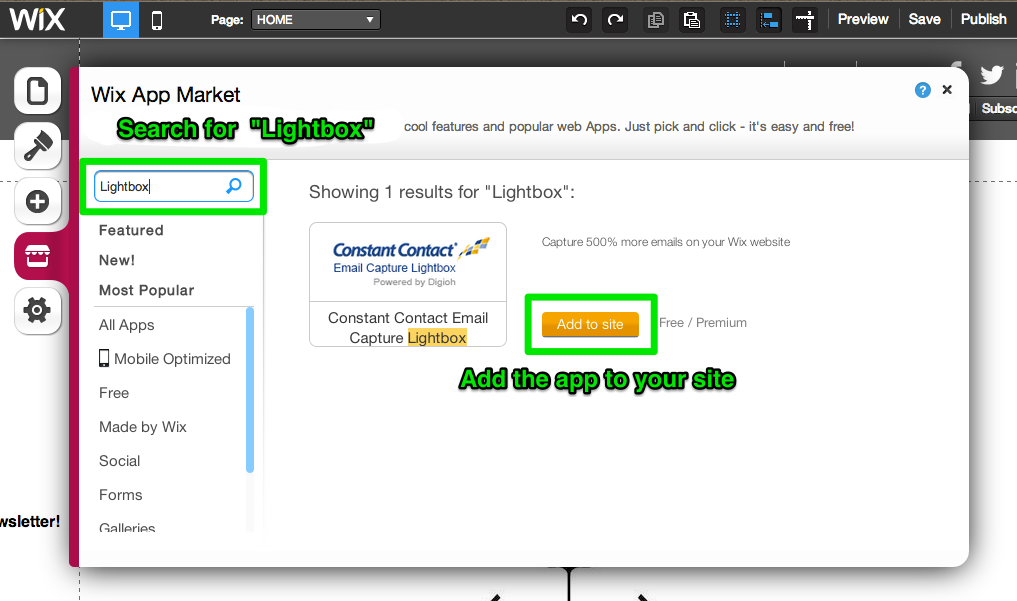
To add a Lightbox to your Wix website, log in to your Wix account and go to the Wix editor. Navigate to the App Market in the left-side menu. Then, search for “Lightbox.” Next to the Email Capture Lightbox, click the Add to site button.
Now, Lightbox is added to your site! When people sign up by filling out the form, they’ll automatically be added to your Wix Contacts list. In order to get the most use from the Lightbox, however, you’ll also want to connect your Email Marketing Platform (in our example, Constant Contact) to add your new subscribers there as well.
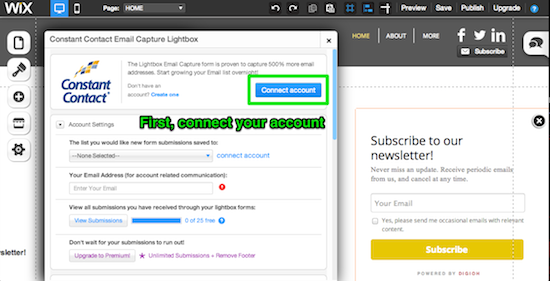
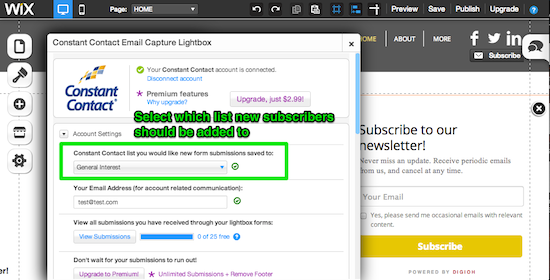
After clicking the Connect Account button you will be asked to log in to your account to authorize the connection. Once you do this, your account will be connected to your Lightbox, and you can select which list you’d like to add your new subscribers to.
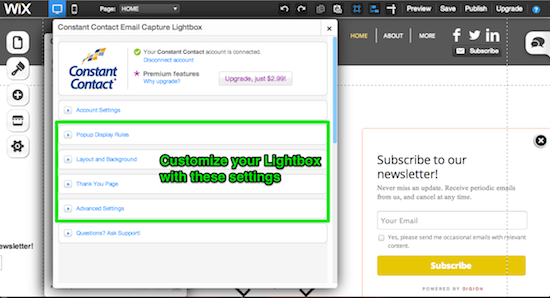
Now that you’ve finished setting up your own Lightbox, you should put some icing on that cake! You have a great amount of customization available that can help you optimize your lightboxes for more conversions. Here’s a breakdown of the following customizable settings:
- Display Pop Up Rules – change where and when the Lightbox appears. Use these rules to trigger your lightbox at the right moment.
- Layout and Background – change the background color and box size. Choose colors that complement your site design while still standing out from the rest of the page.
- Thank You Page – customize what message subscribers see after signing up. Thank your subscribers for signing up, or use this space to point them to their next action.
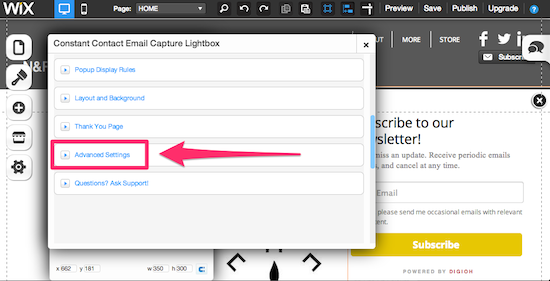
- Advanced Settings – alter the look and text of the Lightbox or add a name field. While it’s nice to learn more about your subscribers for personalization and segmentation, including more form fields may cause some potential subscribers not to convert.
After customizing your Lightbox, be sure to give it a test run by signing yourself up in Preview mode.
2. Offer a Discount Coupon
People love deals. That’s why sites like Groupon have a million email subscribers or why you get a new 20% off Bed Bath and Beyond deal every other week. Offer your customers a promo code in exchange for an email address to see your subscription numbers climb.
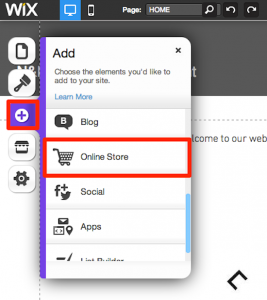
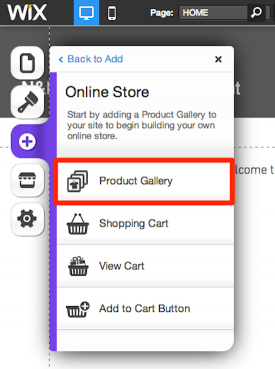
To send a coupon to new subscribers, we’ll need to create a code in Wix. First, log in to your Wix account. If you already have a Product Gallery, just click on it to bring up Manage Store. To add a Product Gallery, go to the Add tab on your left-side menu, choose Online Store, then Product Gallery.
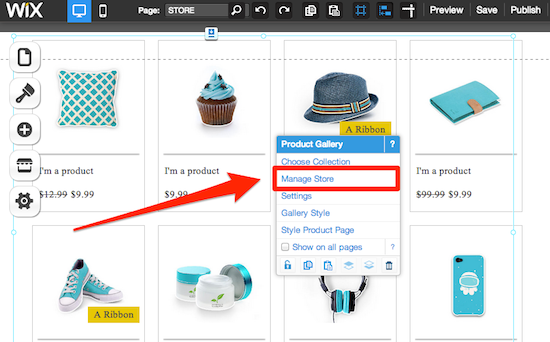
When you’ve added the gallery, click on it and in the menu, select Manage Store.
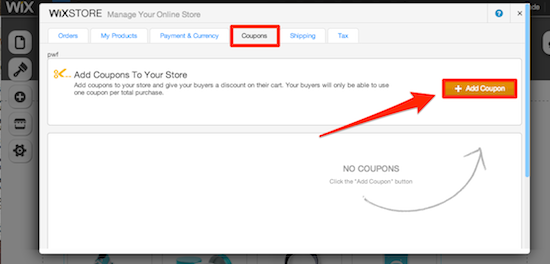
In the Manage Store screen, go to the Coupons tab and Add a Coupon.
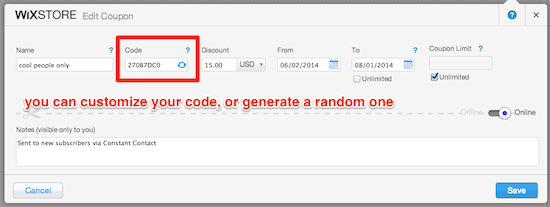
Fill in the details and save. Now, let’s set it up so that this code will automatically send to your new subscribers. You can do this with the email marketing automation tools available in your email platform. In this example, we’ll show how it works in Constant Contact.
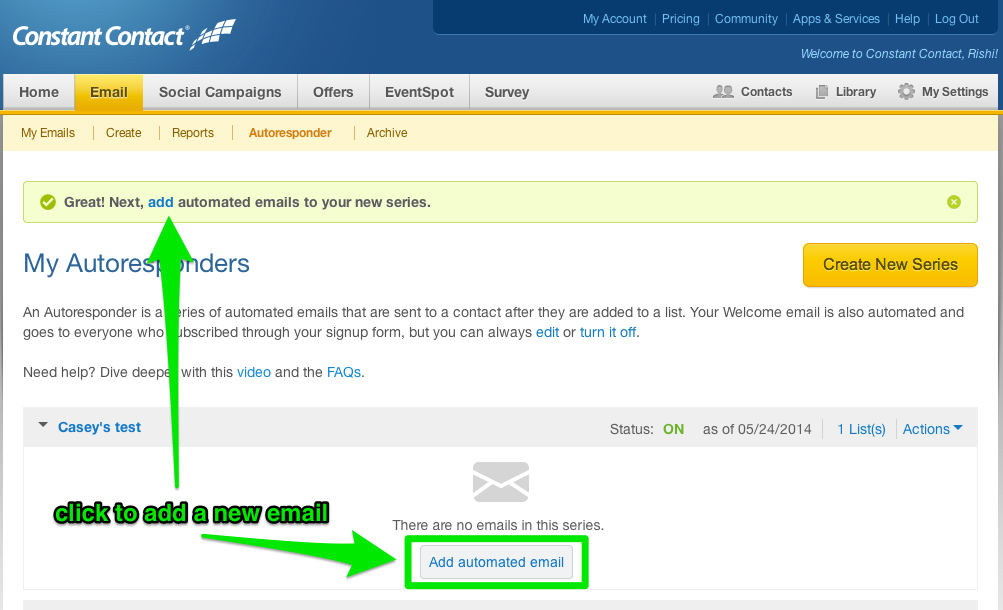
Head over to your Constant Contact account and navigate to the Email tab, then to the Autoresponder tab and click Create New Series.
Give your new Autoresponder a name. Be sure to select the same email list that people are subscribing to from your Wix website. Save and then click Add automated email.
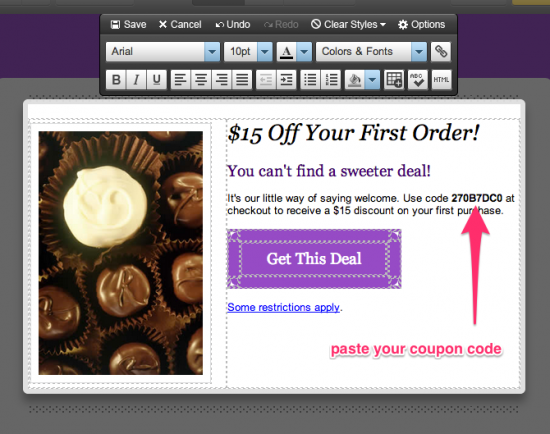
On the next page, choose to start from scratch or copy from an existing template. Now you’ll be able to compose your email. Hover over and click into the sections of your email to edit them. Look to the menu on the left for more options, such as adding images or changing color schemes. In the email body, paste your Coupon Code.
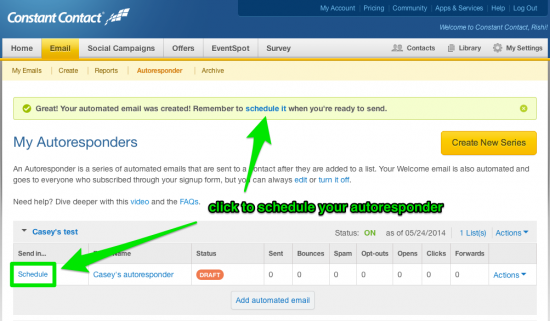
When you’re happy with your email, click Finish. You’ll be returned to the Autoresponder main page and can now schedule your email.
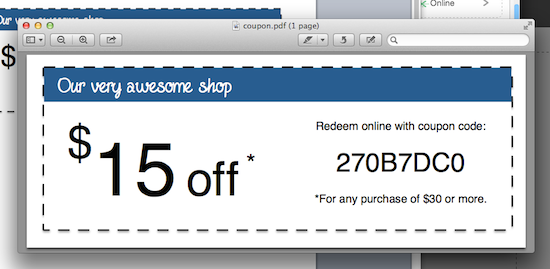
If you want to get extra fancy, you can design your own coupon and link to it from your email.
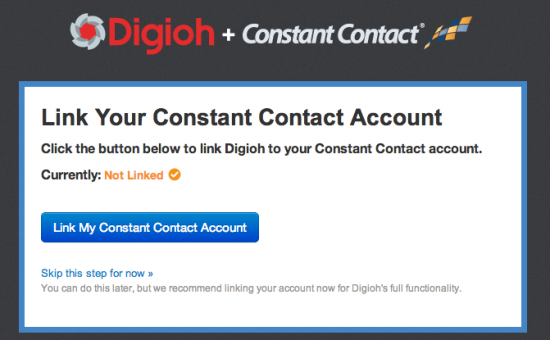
To do this, create a free Digioh account and connect your Constant Contact account.
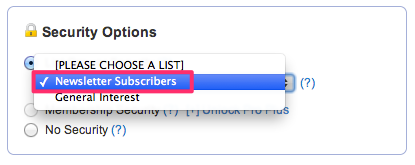
Use the red Select a File button to upload your coupon. Under Security Options you’ll be able to set the security level for the file. The security level tells Digioh what to do when someone who is not on your list tries to access your file, like when someone forwards the email link to a friend.

You can choose from List Grower Security where it will ask them to sign up in order to download the file, or Membership Security, which will block anyone not already on your list from accessing it. For this, I’d recommend choosing List Grower Security.
On the next page you can add your logo and customize your download page for a branded, professional look.
Then, on the next page you’ll be given the download link to copy and paste into your Constant Contact email.
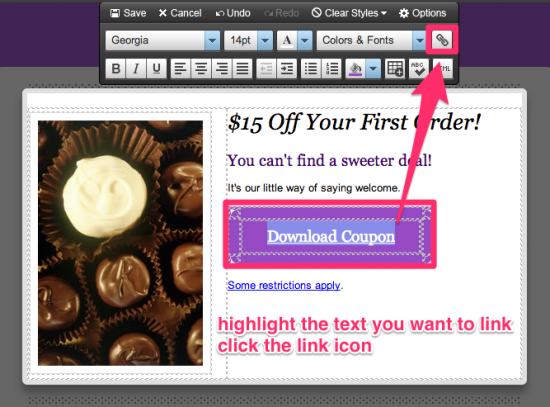
Just highlight the text you want to link and click on the link icon.
Then paste your Digioh download link into the Link URL field.
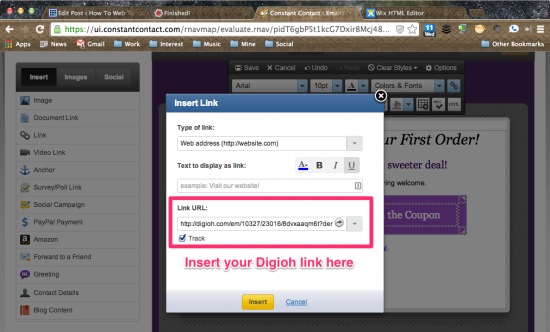
And that’s it! Now watch both your email list and your sales grow!
3. Use Fewer Fields
Do you really need to know your potential subscriber’s home phone number or favorite color? It may be useful data to you, but is it critical? Convenience has a lot to do with list growth, so if your form feels like 20 questions, it’s time to slim down your sign up form to fatten your subscription list.
As a general rule of thumb, fewer fields = more emails. In most cases, the best email sign-up form you could offer is one that only asks for an email address. You’ll find that asking for lots of information gives people form-fatigue, leading to form abandonment. They may also get form-paranoia because they don’t want to receive unsolicited phone calls or snail mail spam. People won’t separate past experiences with spam with your good intentions, so it’s better to just not ask for this kind of information in the first place.
If you absolutely need more data, it’s helpful to let your subscribers know why. You may also consider creating a multi-step form to progressively capture additional information after visitors submit their email address first.
Finally, keep in mind the user experience of your form. If you ask for more than just name and email, get an outside reviewer to double-check that your form is clear and easy to follow. Otherwise you may end up losing potential customers due to confusion and/or frustration. The folks at Expedia, for example, found out they were losing $12 million dollars a year all because of one form field. Check out their story here.
back to top
4. Give away a Free PDF
If offering a discount coupon doesn’t really fit in with your business model, you can still reward your potential customers with some other type of valuable file.
For instance, if you sell high-priced and/or complex items (e.g. cars), you can send an informative pamphlet. Or, perhaps you run a design agency; you could send sample graphic files as a way to get people to sign up. Let them download a free report, whitepaper, or case study about your company and your customers. In order to get the information, the visitor will need to enter in their email address.
Here’s how to automatically send a file when someone signs up through your Constant Contact Form. If you don’t use Constant Contact, you can find instructions for other platforms here.
Log into Constant Contact. On the Home page, click on Sign-Up Tools on the right side of the screen. Now, you can either click on the existing Sign-Up Form to edit it, or you can Create a Sign-Up Form.

Enter your form’s title and description, then select the list you want people to sign up for. Follow the remaining steps and save your form. You’ll be returned to the Sign-Up Tools page. On the right side of the page click on the link icon to copy the URL for your form.
In your Wix editor, go to Add, then Buttons & Menus, then Button. Click on the newly added button and go to Link To. Paste your Sign-Up Form URL and choose to open in a new window. Customize your button.
Now that you’ve set up your form, you’ll need to set up your document. Sign up for a free account with Digioh, a service that allows you to send, track, and protect files for your Constant Contact subscribers. Once you have a Digioh account, connect it to your Constant Contact account and Add a File.
Under Security Options, select List Grower Security, which will ask a person who is not currently on your email list to subscribe in order to see the document.
Move on to the next page. Your document will upload and you’ll receive the download link to copy/paste in your Constant Contact welcome email.
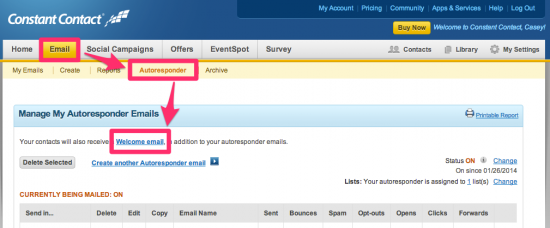
With your download link in hand, go to Emails, then Autoresponders. Click on Welcome Email. One thing to know about the welcome email is that it is sent immediately after someone signs up (unlike autoresponders which take one day), but the it is not list-specific, therefore, be sure to craft a welcome message that could apply to all of your lists. (If you can’t, check out the autoresponder option.)
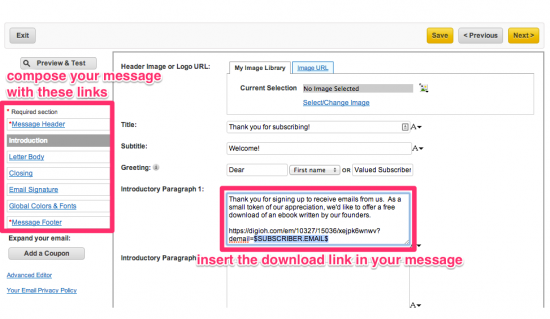
Use the links on the left to edit the various sections of your welcome email. In one of the paragraphs you’ll want to insert your Digioh download link.
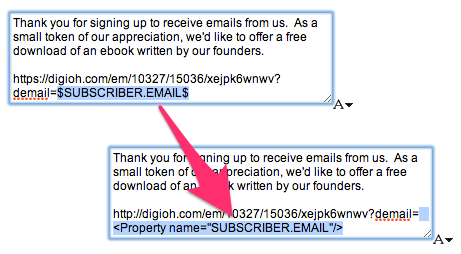
Normally you can insert or hyperlink to your download using a WYSIWYG editor when composing emails within the site, but the welcome email editor operates a bit differently, so we’ll have to make one small adjustment to your link. When you paste your download link, replace $SUBSCRIBER.EMAIL$ with <Property name=”SUBSCRIBER.EMAIL”/>.
Now save the email and be sure to activate the changes. You can get to the activation by going through each step (recommended) or by clicking on Exit, then Finish.
Now that you have your email completed, the last thing to do is to test everything by signing yourself up through your sign-up form.
5. Send New Product Alerts
If you have a few customers that are obsessed with your products, all you may need to do is ask them to sign up for new product alerts.
One of my favorite websites is a three-person company that sells jeans. They never have any discounts or sales. All they do is simply send me an email whenever they have a new product in stock. They send only a handful of emails each year, and yet, I purchase at least 25% of the time. On top of that, their well-crafted newsletter is something I look forward to.
You can make sure that your biggest fans won’t miss a beat by asking them to sign up for new product alerts. The best way to do this is by adding a customized Email Capture Lightbox to your Wix website.
Add the Lightbox, then, in the Lightbox settings menu, click on Advanced settings.
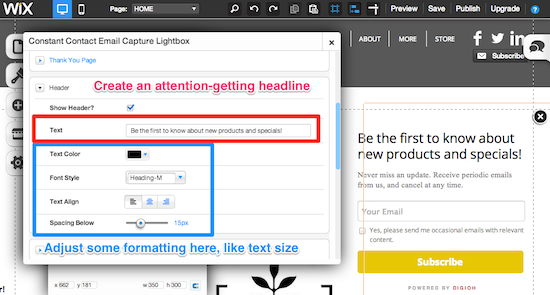
It will expand to show you the various advanced settings options. Click on Header first.
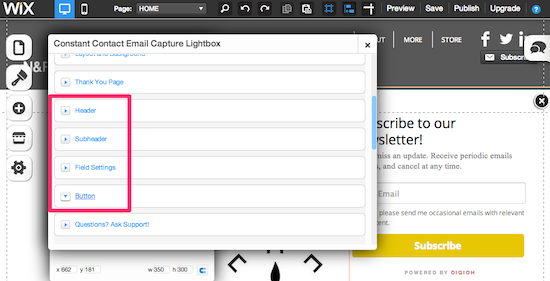
Create an attention-grabbing headline that offers to keep subscribers updated about your new products, discounts, etc. You can adjust the formatting of the text a bit here, too.
Do the same thing for the Subheader settings. Then click on Field Settings. Here you can add a field to collect the subscriber’s name and also add an opt-in box, if you choose.
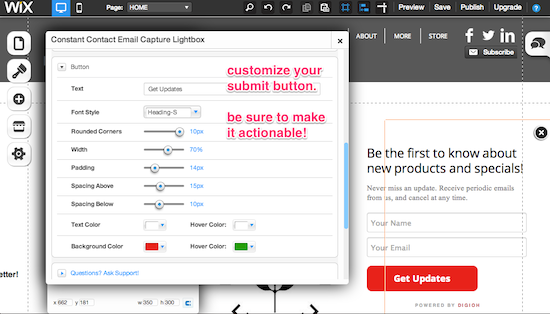
Next, you’ll want to customize your Button. You may be surprised, but the text and style of your button make a difference when someone decides whether or not they subscribe! Make sure your button says something a little more exciting than just “Submit,” and also be sure to choose a somewhat contrasting color for it as that will help draw eyes (and clicks) to it.
Now you’ve customized your Lightbox to create, not just an ask, but an engagement with your customer. Now customers who love you can easily subscribe to your latest news.
While you’re looking at the settings here, be sure to take a look at the other settings options, too, like the Thank You Page and Popup Display Rules, which will put the finishing touches on your Lightbox.
For advanced list growth, you may even try allowing visitors to sign up for back-in-stock email notifications when an item is unavailable.
PS- Another neat feature is that the Lightbox will automatically try to fit the style profile of your site! Just another way that the Lightbox helps keep your site looking sleek and professional.
So there you have it! 5 easy ways you can start building your email list right now through Wix. Which one will you try first?









There’s definately a lot to learn about this subject.
I like all of the points you have made.